Late last week I had ordered a couple of Riviera II charm packs thinking I would either use them for summer placemats or maybe use them in some manner in my FWIS quilt----depending on the prints of course. Some of these are less subtle than others, after all! I had also ordered some go-with yardage called Bikini Dot in Spring Green. The dot IS really subtle but you can see it better if you look for #4946 on the website link.
Here is what came! Quilter's Candy Basic in what might be called Persimmon #3942. Check the label though.
Anyway, hooray for the Connecting Threads Customer Service Representative. The correct order is placed and she said to keep the fabric, donate it whatever. No need to send it back even though they have instructions for doing so. She said it costs them more to correct their error in the long run as returns go to Columbus, OH and they are based in Vancouver, WA. I said I had a Halloween project planned so this looked like pumpkins to me and thanked her.
DJ had the same thing happen last week with a pair of overboots I had ordered on his behalf. I messed up and entered the wrong size and did not discover my error till it was too late. I called customer service back immediately with the order number---the CSR said she would fix it when the order came in. She didn't and the wrong ones came. When DJ called to correct it, they talked as though they would send a return, pick up slip for them. Instead he got a note to keep them, donate them, but there was no need to send them back. I am probably going to drop them in one of the donation bins the next time into town.
My error, their error--they don't want their stuff back. Do they just write this off as the cost of doing business then?
~~~~~~~~~~~~~~~~~~~~
Norma and I put our heads together this morning and decided what we want to do for our Halloween Row quilt. So yes, I do have a Halloween quilt in the works! I wrote up a document just to record what we were thinking of doing at least at this point in time anyway, LOL. Never know about us!
We both want to do some blackwork stitchery for our versions. She has ordered a Halloween Fun pattern she tracked down on FB after finding the pictures on the page of A Quilter's Oasis and asked the pattern resource. (Apparently there is a group that does redwork at the shop). I like that one too but I elected to get one from Bird Brain Designs that is actually the center table of a Halloween table runner. 8 x 20 so that should work well for my needs with some filler around it and perhaps some other Halloween or Fall motifs. We both have patterns to draw from for the other elements. A bat from this one, a pumpkin from that---options of foundation piecing or appliqueing. They won't be twin quilts by any means!! Row of the month or more. I think we will start with that twister row though since Cher, Pat, Norma and I were going to do something with our lil twister rulers anyway sometime next month. Looking forward to it!
So far I have not even started my re-do of Crazy Anne though I certainly intended to do so yesterday. Robert Kaufman's free patterns captured my attention. Actually I started because I was looking for the pattern link I gave you yesterday for the Mary's Triangles thing in solids---it might be on the designer patterns though. Still I was finding things to download--for another day.
Whirligigs was one that caught my eye since I do have a Spools block to do further down in my FWIS quilt. I like the looks of the alternate block too though. 8 pointed pinwheel but it looks kinda square they way it is sitting in the block and not so much dresden plate appearing. HMMMM. See if I can resize this.
Well that Crazy block is not going to get done if I don't get to sewing. I'll be going back up tomorrow afternoon to get pictures of the quilt show and then help take it down. Question is, will Gary let us start earlier than 5:30??
Sep 21, 2012
Sep 20, 2012
today's hint/Mary's Triangles EDITED
The note I scribbled on the computer printout says it all. Actually I thought it looked even worse last night as it looked as though I had about zip seam allowance on the "Mary's Triangle" section side. Turned out a few threads were tucked under a bit so it is not quite as bad as I thought. I think the background is a tad too dark anyway. Give it another whirl.
I mentioned yesterday that Marti Michell had a suggestion for doing those pieced half square triangles comprised of a square and two small half square triangles. Billie Lauder has a quick quilt trick for doing this which I have done in the past. I believe that she borrowed the process from Sally Schnieder. In fact, I KNOW she did as her booklet Quick Quilt Tricks, 2nd edition attributes the technique to Scheider's Scrap Mania published in 1994 from That Patchwork Place (now Martingale & Company).
The name "Mary's Triangles" refers to this unit and is sometimes called Flying Geese or Shaded Four Patch. It is a shortcut method and you don't actually have to cut and sew triangles at all. There is no fussing with matching points or hoping that all your blocks will turn out the same size. It is made with squares and rectangles. Sounds pretty good, huh? In retrospect I probably should have tried to figure out how to make it work Schneider's way, LOL. Sometimes YOU do see the variation with the same sized small half square triangle in the corner. This is a more common element in blocks than you would think!
ED. NOTE take a look at THIS quilt from jaybird quilts----the whole quilt is nothing but Mary's Triangles!
There is a perfectly wonderful tutorial for doing it Schneider's Way at this SITE trailtotreadleonia. By all means try that out whenever you have a bunch of these units to make. The book Triangle Tricks: One Easy Unit, Dozens of Gorgeous Quilts has charts worked out for cutting sizes for blocks A & B in finished sizes from 2 inch to 12 inch. Worth checking out in your guild library, public library or your own personal guild library.
So why didn't I do it this way? Frankly I didn't even think about it and I had just made a strawberry patch block three of these same type half units. Here is a link to a good example of what I was talking about on starwoodquilter. As an aside, Susan linked her block choices for her version of FWIS with her grandmother's diary entries the year she turned 21. Fun reading!
I told you the block is Crazy Anne. It is a 5 x 5 grid. Slightly odd, in between size in other words as opposed to the standard strip size of 1.5, 2, 3.5 inch sizes you would associate with a 6 inch finished block. Do the math? Yeah, I could but going to. My head hurts already and math was NEVER my best subject!
Instead Michell suggested cutting 2 squares and piecing them as shown below. The bottom strip was cut to the same width as the squares but the length of the two squares sewn together. I started with 2 1/4 inch squares and the rectangle was 2 1/4 by 4 if numbers will help explain that, LOL.
Anyway, I trimmed it 1/4 inch away creating the shape I needed below and then cut a square the same size this finished. I miscut it first and then cut a 4 7/8 inch square in half diagonally and nubbed off the points with the Judy Martin point trimmer tool.
I DID get my twister square prepped yesterday and assembled this whatever it is going to be--,maybe a placemat, maybe a wall hanging. I thought about quilting it up for Tuesday but why? No rush.
Quilt show is up and I don't have to go back till Saturday afternoon. Thankfully that went a whole lot more smoothly than in years past. Some of the potential snags were averted ahead of time by having a 10 days lead time for entries. People got the message about having sleeves on the entries excluding maybe two of them Jane said. They still messed up about a pillow case for each entry but we can deal with that. They also had a chance to pin up the extra long bed quilt entries ahead of time. We will do take down as they did at Friendship Quilters---put the pillow cases by the quilt entry and plunk them in their bag right as they come down---just need a catcher and a folder helper. Worked great!
Well, a pan of tilapia is waiting along with a box of risotto and whatever veggie I want to fix to go with it. I'm off and back to the machine after we eat. Got a husband raring to get back on the lawn mower to finish up the yard and reminding me that daylight is burning.
And sew it goes-------
I mentioned yesterday that Marti Michell had a suggestion for doing those pieced half square triangles comprised of a square and two small half square triangles. Billie Lauder has a quick quilt trick for doing this which I have done in the past. I believe that she borrowed the process from Sally Schnieder. In fact, I KNOW she did as her booklet Quick Quilt Tricks, 2nd edition attributes the technique to Scheider's Scrap Mania published in 1994 from That Patchwork Place (now Martingale & Company).
The name "Mary's Triangles" refers to this unit and is sometimes called Flying Geese or Shaded Four Patch. It is a shortcut method and you don't actually have to cut and sew triangles at all. There is no fussing with matching points or hoping that all your blocks will turn out the same size. It is made with squares and rectangles. Sounds pretty good, huh? In retrospect I probably should have tried to figure out how to make it work Schneider's way, LOL. Sometimes YOU do see the variation with the same sized small half square triangle in the corner. This is a more common element in blocks than you would think!
![]() |
| Block A |
![]() |
| Block B |
ED. NOTE take a look at THIS quilt from jaybird quilts----the whole quilt is nothing but Mary's Triangles!
There is a perfectly wonderful tutorial for doing it Schneider's Way at this SITE trailtotreadleonia. By all means try that out whenever you have a bunch of these units to make. The book Triangle Tricks: One Easy Unit, Dozens of Gorgeous Quilts has charts worked out for cutting sizes for blocks A & B in finished sizes from 2 inch to 12 inch. Worth checking out in your guild library, public library or your own personal guild library.
So why didn't I do it this way? Frankly I didn't even think about it and I had just made a strawberry patch block three of these same type half units. Here is a link to a good example of what I was talking about on starwoodquilter. As an aside, Susan linked her block choices for her version of FWIS with her grandmother's diary entries the year she turned 21. Fun reading!
I told you the block is Crazy Anne. It is a 5 x 5 grid. Slightly odd, in between size in other words as opposed to the standard strip size of 1.5, 2, 3.5 inch sizes you would associate with a 6 inch finished block. Do the math? Yeah, I could but going to. My head hurts already and math was NEVER my best subject!
Instead Michell suggested cutting 2 squares and piecing them as shown below. The bottom strip was cut to the same width as the squares but the length of the two squares sewn together. I started with 2 1/4 inch squares and the rectangle was 2 1/4 by 4 if numbers will help explain that, LOL.
Michell of course wanted you do the cutaway with one of her triangle units. I don't think that the S set contains what I needed to do that especially now that this would NOT fit in a 6 inch finished block. I use a Trudie Hughes Big Mama and Big Daddy rulers which has these nice 45 degree marks. Line up the ruler over the sides of the square and cut 1/4 inch away. A Jodi Barrows Square in a Square ruler would do the same thing. I think. I got one of those on the pegboard but I think it is buried below a few others and I am being lazy---or more like need to head out to the kitchen and throw that fish in the oven!
Anyway, I trimmed it 1/4 inch away creating the shape I needed below and then cut a square the same size this finished. I miscut it first and then cut a 4 7/8 inch square in half diagonally and nubbed off the points with the Judy Martin point trimmer tool.
I DID get my twister square prepped yesterday and assembled this whatever it is going to be--,maybe a placemat, maybe a wall hanging. I thought about quilting it up for Tuesday but why? No rush.
Quilt show is up and I don't have to go back till Saturday afternoon. Thankfully that went a whole lot more smoothly than in years past. Some of the potential snags were averted ahead of time by having a 10 days lead time for entries. People got the message about having sleeves on the entries excluding maybe two of them Jane said. They still messed up about a pillow case for each entry but we can deal with that. They also had a chance to pin up the extra long bed quilt entries ahead of time. We will do take down as they did at Friendship Quilters---put the pillow cases by the quilt entry and plunk them in their bag right as they come down---just need a catcher and a folder helper. Worked great!
Well, a pan of tilapia is waiting along with a box of risotto and whatever veggie I want to fix to go with it. I'm off and back to the machine after we eat. Got a husband raring to get back on the lawn mower to finish up the yard and reminding me that daylight is burning.
And sew it goes-------
Sep 19, 2012
WIP Weds
This is where I left off last night at 8:30. Another of my FWIS blocks but one of my additions and/or substitutions called "Crazy Anne" #1856. This is the 17th block of 111.
I used a Marti Michell suggestion on the conversion chart for this one but added another short cut to eliminate another seam. The process I used might be a good "hint" for another post so I will get some pictures and graphics so it might make more sense than my describing it.
I cut it out with instructions from EQ but that left that pink and background piece with a very long skinny, machine eating shape. I would call that a recipe for disaster!! I do own a set of Tri-Recs rulers and knew from past use they had a way of nubbing those off that made it easier to line up and stitch the pieces without guessing how much to off set the overlying piece. It appears to be right on the money but I think I need to square up those "Mary's Triangle" units a bit before I join the remaining sections.
Of course, after I posted the other day I had to play with the Twister ruler a bit but mostly because I wanted to size a block would result if you put 4 charm squares together. The answer was 9 inch finished (9.5 with seam allowances). BUT I cut and stitched the whole block up and still need something for demo purposes.
Not anymore----I slapped 4 squares together and just need to put on the background bits and I'll be set for Belles on this coming Tuesday. Maybe I'll just join the two blocks and put some sort of frame around them for another placemat?? Or more likely it will go in my long awaited Oxmoor House adapted Christmas quilt. My blogging lefthandedquilter pal and her friend Linda are starting their Christmas race. It was tempting to pull that out and join in but I am resisting..........for now anyway. Too many irons in the fire at the moment.
I was playing around with this on Monday afternoon as well. Oh, you KNEW I would, LOL. Pat may be joining Cher, Norma and I when we do the twister sew date. She has a guild challenge coming up and this might be a pattern option. I mentioned that Martha Thompson tells you to warm up to the technique by making a placemat---or 4, LOL. This technique is from her book Square Dance, after all, but someone made a ruler to make the cutting easier than marking around it with a template. The acrylic ruler with feet stays put while you cut........ which is nice.
Anyway, she says to cut the squares 4.5 inches and the border around it about 3 inches. Set the squares in a 3 x 4 grid. Once you border the twisted stuff again it would finish up about 14 1/2 x 17 inches. Pat wondered how big this might turn out. Mine unstitched , measures that exactly. If my math is correct I think I would lose 2 inches in the length and 1 1/2 in the width and that should STILL fit my plates. I'm just goofing around and don't know what I would use for a border anyway since most of these were charms and cut 5 inch squares from another project. That mini red print looks pink and I should have separated the colors in that dark blob in the corner, LOL. The picture is not showing as much contrast as there is in real life. BUT it will do for an example. I've got more Christmas squares leftover but just not bright ones such as the ones I used in this one. I could easily pull 12 more and whip another placemat in another colorway.
And here is another chapter in the "make me happy" category. As a quilter who loves vintage quilts, this box is pure gold to me! The shoe box stuffed with fabric arrived yesterday from my mom. (I knew it was coming.) I didn't have time to really dig through it yet but I love that red stuff on the top!! There are bits of 30s in there too but as I said, I have not had time to look through the treasure this box contains. THX Mom. If not this quilt, then one down the line.
She called yesterday to tell me that she had finished the binding on a very special bed sized quilt. I am happy dancing for her as I know it is not easy for her to do that hand work with achy wrists and hands. She always does the donation quilt binding on the machine. You see, the 2nd grandchild is getting married on October 6th. Blake and Julia live in central IL about an hour from where I am from but have decided to getting married in the Denver area. ( Julia has some family there. So does Blake--my sister Janet and her family.) They know that the quilt is coming. In fact, they had asked for some of the fabric swatches to help in picking out the bed linens and curtains. I know what pattern Mom had picked out and what color was basically selected but I cannot wait to see a picture of it.
The wedding will be small and a reception held later so no, I am not going to the wedding. My sister Diane (the MOG) has made travel arrangements for both sets of grandparents, her husband and herself as well as Blake's sister and her husband to get out there on various time schedules but they all fly back on the same plane. Maybe Blake and Julia are "on their own" for getting to Denver. I'll have to ask Mom the next time I talk to her. Can't have a wedding without the bride and groom!!
Well, daylight is burning and I had planned on making some cookies to take to the quilt set up tomorrow. We were down to 49 for an overnight temp and even with the sun beating down, it is only up 10 degrees from that now. Translation: I won't mind the oven being on while I bake about 5 dozen Pride of Iowa cookies, LOL. And DJ won't mind home baked goodies either.
I used a Marti Michell suggestion on the conversion chart for this one but added another short cut to eliminate another seam. The process I used might be a good "hint" for another post so I will get some pictures and graphics so it might make more sense than my describing it.
I cut it out with instructions from EQ but that left that pink and background piece with a very long skinny, machine eating shape. I would call that a recipe for disaster!! I do own a set of Tri-Recs rulers and knew from past use they had a way of nubbing those off that made it easier to line up and stitch the pieces without guessing how much to off set the overlying piece. It appears to be right on the money but I think I need to square up those "Mary's Triangle" units a bit before I join the remaining sections.
Of course, after I posted the other day I had to play with the Twister ruler a bit but mostly because I wanted to size a block would result if you put 4 charm squares together. The answer was 9 inch finished (9.5 with seam allowances). BUT I cut and stitched the whole block up and still need something for demo purposes.
Not anymore----I slapped 4 squares together and just need to put on the background bits and I'll be set for Belles on this coming Tuesday. Maybe I'll just join the two blocks and put some sort of frame around them for another placemat?? Or more likely it will go in my long awaited Oxmoor House adapted Christmas quilt. My blogging lefthandedquilter pal and her friend Linda are starting their Christmas race. It was tempting to pull that out and join in but I am resisting..........for now anyway. Too many irons in the fire at the moment.
I was playing around with this on Monday afternoon as well. Oh, you KNEW I would, LOL. Pat may be joining Cher, Norma and I when we do the twister sew date. She has a guild challenge coming up and this might be a pattern option. I mentioned that Martha Thompson tells you to warm up to the technique by making a placemat---or 4, LOL. This technique is from her book Square Dance, after all, but someone made a ruler to make the cutting easier than marking around it with a template. The acrylic ruler with feet stays put while you cut........ which is nice.
Anyway, she says to cut the squares 4.5 inches and the border around it about 3 inches. Set the squares in a 3 x 4 grid. Once you border the twisted stuff again it would finish up about 14 1/2 x 17 inches. Pat wondered how big this might turn out. Mine unstitched , measures that exactly. If my math is correct I think I would lose 2 inches in the length and 1 1/2 in the width and that should STILL fit my plates. I'm just goofing around and don't know what I would use for a border anyway since most of these were charms and cut 5 inch squares from another project. That mini red print looks pink and I should have separated the colors in that dark blob in the corner, LOL. The picture is not showing as much contrast as there is in real life. BUT it will do for an example. I've got more Christmas squares leftover but just not bright ones such as the ones I used in this one. I could easily pull 12 more and whip another placemat in another colorway.
And here is another chapter in the "make me happy" category. As a quilter who loves vintage quilts, this box is pure gold to me! The shoe box stuffed with fabric arrived yesterday from my mom. (I knew it was coming.) I didn't have time to really dig through it yet but I love that red stuff on the top!! There are bits of 30s in there too but as I said, I have not had time to look through the treasure this box contains. THX Mom. If not this quilt, then one down the line.
She called yesterday to tell me that she had finished the binding on a very special bed sized quilt. I am happy dancing for her as I know it is not easy for her to do that hand work with achy wrists and hands. She always does the donation quilt binding on the machine. You see, the 2nd grandchild is getting married on October 6th. Blake and Julia live in central IL about an hour from where I am from but have decided to getting married in the Denver area. ( Julia has some family there. So does Blake--my sister Janet and her family.) They know that the quilt is coming. In fact, they had asked for some of the fabric swatches to help in picking out the bed linens and curtains. I know what pattern Mom had picked out and what color was basically selected but I cannot wait to see a picture of it.
The wedding will be small and a reception held later so no, I am not going to the wedding. My sister Diane (the MOG) has made travel arrangements for both sets of grandparents, her husband and herself as well as Blake's sister and her husband to get out there on various time schedules but they all fly back on the same plane. Maybe Blake and Julia are "on their own" for getting to Denver. I'll have to ask Mom the next time I talk to her. Can't have a wedding without the bride and groom!!
Well, daylight is burning and I had planned on making some cookies to take to the quilt set up tomorrow. We were down to 49 for an overnight temp and even with the sun beating down, it is only up 10 degrees from that now. Translation: I won't mind the oven being on while I bake about 5 dozen Pride of Iowa cookies, LOL. And DJ won't mind home baked goodies either.
Sep 17, 2012
Design Wall Monday
Not much happening here though I am sort of surprised that I got THAT much of a block stitched up yesterday! You see, the "squirrel---shiny object" was out in full force, LOL.
BTW the block is called Flower Pot, Brackman assigned #709 source: KC Star 1937. I still have to join the sections and foundation pieced it though that was a choice, not a necessity. Being a 5 x 5 grid can be a little tricky if your finished block is 6 inches. I knew my HST triangle units would have to be trimmed down anyway. Just hope it all meets up like it should. After the recent less than wonderful results, I am paranoid about it.
So what is the distraction? It being the weekend my pal Norma were chatting like we often do. The other three FABS were off in their own pursuits or just hadn't popped up yet in IM. Norma and I along with Cher are planning to do something with our twister rulers, big or small, on an upcoming weekend to be determined. Norma was telling me that she thought that piecing the whole top of squares and then cutting it up a little hard to manage. The bulk of the quilt wants to pull away, maybe it is hard to spread it out on her cutting surface. She was considering doing them in groups of 4 as she has seen this done on a blog somewhere. She looked for the examples to show me on my end.
Actually this makes sense to me ---that little Christmas wall hanging I did for Christmas in July used just 4 charm squares though we did them a row. It would not be much different if you arranged them side by side.
Norma sent me off to http://annalenaland.com/2012/04/18/tah-dah-part-2/ with instructions to "scroll down to the pink and green (twister quilt) one" Okay, I see how the block idea would work. There are a lot of cool quilts and projects that group was working on---bookmarking the site, put it in feeds!!
Here is a link for a gorgeous table runner http://tamarackshack.blogspot.ca/2011/03/lil-twister.html she directed me to.
HMMMM again. Do I still want to do summery placemats?? I was still thinking about twister Christmas wreaths. Here is a simple one that takes about 25 squares of fabric. BEFORE you whack it up http://www.quiltingboard.com/pictures-f5/twister-t74576.html and then see the AFTER right below it along with the finished version. I also found a free Pinwheel Wreath pattern available in a pdf file that has got to be very similar but more squares involved. I even pulled out some Christmas fabric later that I could try this.
So far Norma had not led me too far astray. After all, I had told the Belles that I would show them how to use the Twister rulers at the next meeting. A small project idea may be the ticket for the demonstration and something usable in the holiday season. I found a big pile of charm squares leftover from my Christmas Patience Corner so there are all kinds of possibilities.
Then she found this Halloween row quilt---also on that annalenaland.com link. OH OH, I was in trouble and I was dragging her down with me. It is not my image to post here so I will link you to the photo or if that won't open then try this one and keep scrolling down.
http://annalenaland.com/2012/04/06/spring-quilt-escape-show-and-tell-part-2 Okay, there is a row of twisters in there done up as blocks. But you can almost tell where this is going, can't you?
I love row quilts, we both love that Halloween row quilt. Chances are this was a pass around project and there is no available pattern. We can do a Halloween row quilt---we both have patterns, books, magazines, EQ. Not sure how much fabric I would have for a Halloween row quilt but there is some up there. Connecting Threads has a cute row too called Spooktacular Row but sold as a kit. Click on "view more images" to see the quilt opened up instead of artfully arranged. Cool fabrics in there too. I love the cat row!
So I was off to collect Halloween pattern possibilities in EQ, Norma was off to look at patterns and books. I think this might be a "go" for some weekend in October even if we both just do a twister row then. No, not done for this year. Conversation to be continued!
Thanks Norma for the inspiration. With all the wedding preparations, and staying on task, it had been a little while since we could surf and dream together. What fun!
Today's plan for me: finish the block above and I think a variation of Puss in the Corner follows after that. but I got the thangles out for that one and just cut strips. Another pinwheel type element at center--oh, boy! Wish me luck!
I will be going with Jane on Thursday to help set up the Gadsden Quilt show and then go up Saturday evening to help with take down/bring my quilts home. Best get some sewing in this week while I can or even cut out something for a Wreath. That base won't take long to whip up. And sew it goes-------
BTW the block is called Flower Pot, Brackman assigned #709 source: KC Star 1937. I still have to join the sections and foundation pieced it though that was a choice, not a necessity. Being a 5 x 5 grid can be a little tricky if your finished block is 6 inches. I knew my HST triangle units would have to be trimmed down anyway. Just hope it all meets up like it should. After the recent less than wonderful results, I am paranoid about it.
So what is the distraction? It being the weekend my pal Norma were chatting like we often do. The other three FABS were off in their own pursuits or just hadn't popped up yet in IM. Norma and I along with Cher are planning to do something with our twister rulers, big or small, on an upcoming weekend to be determined. Norma was telling me that she thought that piecing the whole top of squares and then cutting it up a little hard to manage. The bulk of the quilt wants to pull away, maybe it is hard to spread it out on her cutting surface. She was considering doing them in groups of 4 as she has seen this done on a blog somewhere. She looked for the examples to show me on my end.
Actually this makes sense to me ---that little Christmas wall hanging I did for Christmas in July used just 4 charm squares though we did them a row. It would not be much different if you arranged them side by side.
Norma sent me off to http://annalenaland.com/2012/04/18/tah-dah-part-2/ with instructions to "scroll down to the pink and green (twister quilt) one" Okay, I see how the block idea would work. There are a lot of cool quilts and projects that group was working on---bookmarking the site, put it in feeds!!
Here is a link for a gorgeous table runner http://tamarackshack.blogspot.ca/2011/03/lil-twister.html she directed me to.
HMMMM again. Do I still want to do summery placemats?? I was still thinking about twister Christmas wreaths. Here is a simple one that takes about 25 squares of fabric. BEFORE you whack it up http://www.quiltingboard.com/pictures-f5/twister-t74576.html and then see the AFTER right below it along with the finished version. I also found a free Pinwheel Wreath pattern available in a pdf file that has got to be very similar but more squares involved. I even pulled out some Christmas fabric later that I could try this.
So far Norma had not led me too far astray. After all, I had told the Belles that I would show them how to use the Twister rulers at the next meeting. A small project idea may be the ticket for the demonstration and something usable in the holiday season. I found a big pile of charm squares leftover from my Christmas Patience Corner so there are all kinds of possibilities.
Then she found this Halloween row quilt---also on that annalenaland.com link. OH OH, I was in trouble and I was dragging her down with me. It is not my image to post here so I will link you to the photo or if that won't open then try this one and keep scrolling down.
http://annalenaland.com/2012/04/06/spring-quilt-escape-show-and-tell-part-2 Okay, there is a row of twisters in there done up as blocks. But you can almost tell where this is going, can't you?
I love row quilts, we both love that Halloween row quilt. Chances are this was a pass around project and there is no available pattern. We can do a Halloween row quilt---we both have patterns, books, magazines, EQ. Not sure how much fabric I would have for a Halloween row quilt but there is some up there. Connecting Threads has a cute row too called Spooktacular Row but sold as a kit. Click on "view more images" to see the quilt opened up instead of artfully arranged. Cool fabrics in there too. I love the cat row!
So I was off to collect Halloween pattern possibilities in EQ, Norma was off to look at patterns and books. I think this might be a "go" for some weekend in October even if we both just do a twister row then. No, not done for this year. Conversation to be continued!
Thanks Norma for the inspiration. With all the wedding preparations, and staying on task, it had been a little while since we could surf and dream together. What fun!
Today's plan for me: finish the block above and I think a variation of Puss in the Corner follows after that. but I got the thangles out for that one and just cut strips. Another pinwheel type element at center--oh, boy! Wish me luck!
I will be going with Jane on Thursday to help set up the Gadsden Quilt show and then go up Saturday evening to help with take down/bring my quilts home. Best get some sewing in this week while I can or even cut out something for a Wreath. That base won't take long to whip up. And sew it goes-------
Sep 15, 2012
FWIS 1-10
Okay, I have reached the first 10 blocks of MY version of Farmer's Wife (Inspired) Sampler. I had promised not to post the blocks till I had a grouping to show but obviously the piecing etc is on my mind if I am working on them in the background. That piecing has inspired the last two tip posts, in fact. My mom called last night and said I should use a thread spider to start the stitching and avoid the bias edge of a triangle or QST getting sucked in. I will do that since I will start the next batch on the Brother.
I have my share of sewing snafus this week but I know that happens to all of us. Sometimes you forget something you learned long ago. Sometimes you need to learn some new tricks. I am working on a "new to me" machine that may not be happy going over seams of say, the pinwheel that was giving me fits yesterday. It is a humbling experience when you think you can do a simple block like that and it still comes out a bit off. Well, this may not be the masterpiece work I had hoped but I am going to try to cut myself some slack. Pinwheel, meet that galloping horse. I will share my cautionary tales so we can commiserate about our "bad" days. Mom was having fits with one of her own recently. That might have been part of the reason she called, LOL.
A list mate on the Farmer's Wife Sampler yahoo group suggested scanning the blocks. Until I can figure out where in the house to hang them blocks to take a digital shot that is what I will do. Some of these are my choice of blocks---if so, I will list the name and pattern source. Usually it will be a Brackman assigned number from BlockBase. If they are some that were used in the Laurie Aaron Hinds book, I will indicate the name assigned in the book though the block are in the public domain. We all know that a block has more than one name in a lot of cases. I cannot remember if I am allowed to use the block number or not. BUT all that number is the blocks in alphabetical order till it reached 111. No big deal and I cannot see how that could be copy-righted. Someone will scream at me if I did inadvertently, not see it their way.
LCHJ Block 1---Castle. Pattern source: Quilt Pro Block of the Day for February 22, 2012. I used some of the birthday fabric that I got in Boaz recently for this one.
LCHJ Block 2---Snowball from the book. The fabric strip I used came from my friend and fellow Bama Belle Lois. Some went in the Popsicle Sticks quilt top but this was I set aside for FWIS. It is the perfect shade of blue I had envisioned! Background fabric, coincidentally, reclaimed and re-purposed from some abandoned blocks I recently un-sewed.
LCHJ Block 3---Modified Cherry Basket from Quilt Pro Block of the Day March 26, 2012. Modified because I added the handle to the block. The Riley Blake background, bday fabric. The Basket fabric is leftover from the March Button Up and my friend Sheila.
LCHJ Block 4---K022 Aunt Mary's Favorite. Since I was foundation piecing the center square in a square section I did the side pieces that way as well. The pinks are some of Boaz b'day splurge.
LCHJ Block 5---from the book Wild Rose & Square but I modified it to eliminate some seams. (Print fabrics are Vintage Modern and DJ bday splurge). I talked about a technique for doing the diamonds the other day. Mom reminded me that these were not true diamonds----and she is right. I had called them the wrong thing--they are indeed parellolograms and I knew that when I cut them, LOL with the Marti Michell template conversion charts.
I did so well with one half of the block. SIGH. The squares fit in perfectly and without hassle. The third one gave me a little trouble but I got past it. The 4th one, not so much. 4 tries, two with re-cutting. Finally I got that stinkin's square in there----and then I promptly sliced that square when the ruler slipped in trimming off the little hairs for the picture. I patched it and you can see the seam down there without looking too hard. This may or may not make the cut but I did finish it.
LCHJ Block 6--from the book, Waste Not. The same night I sliced up the one above, I got right back on the horse and stitched this one. I used a Marti Michell trick for cutting it out---it is just half square triangles essentially with another piece angle cut, sewn and flipped. Fabrics from my stash though I did get that white piece at Heart to Heart recently.
LCHJ Block 7---1266b Whirlwind. This is the one that was demoralizing me yesterday. The first one I pieced conventionally and the center looked worse that this one. I took it out--twice--and made it worse. I foundation pieced it and everything looked fine---till I joined it. I think that the Kenmore (nope still not named) may have been balking at the seams as I had it pinned and perfectly in line. Pinwheel, meet Galloping Horse. The print piece is actual vintage fabric. The teal was a bday gift from my friend and fellow Bama Belle Teresa.
LCHJ Block 8---Autumn Tints from the book. I had to prove to myself that I could piece! Even this one would not nest at center but I fixed it. It was not one I had cut out in the last cutting and kitting binge but it may take the place of the one above in with the same fabrics.
LCHJ Block 9---30's style butterfly that I told you about in THIS POST. Well, I did it because I sure needed to not be piecing anymore yesterday. Pretty cute, if I do say so. It will go on a spot lower down the line.
LCHJ Block 10---yeah you have seen it before. So far it is still staying in but down the line. From the book (sort of) Seasons but not really from there---more like credit to Fons and Porter for their mag article on Album Cross, but re-sized from 8 inch block to a 6.
So there you have it for now. No more whining about what didn't go right, at least not for today. I am chosing to focus on what I did get done. That is to say I have 10 blocks completed that I didn't have done a couple weeks ago after months and months of wanting to work on this project.
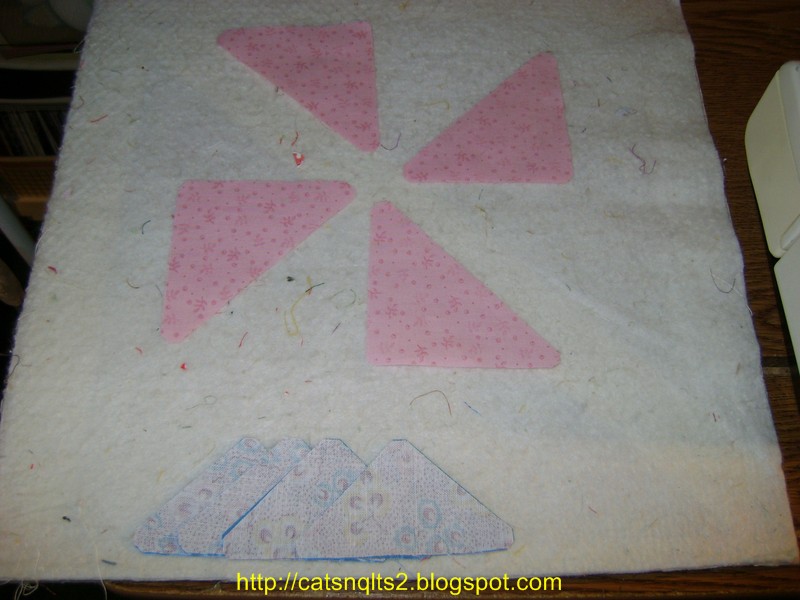
Today's plan: hand applique the sections of 3418 The Whirling Pinwheel that you saw laid out in THIS POST. Well, make that the straightened out version, LOL. Get that done and it is on to Practical Orchard. Yep, back on that horse.
And sew it goes------thanks for stopping by!
I have my share of sewing snafus this week but I know that happens to all of us. Sometimes you forget something you learned long ago. Sometimes you need to learn some new tricks. I am working on a "new to me" machine that may not be happy going over seams of say, the pinwheel that was giving me fits yesterday. It is a humbling experience when you think you can do a simple block like that and it still comes out a bit off. Well, this may not be the masterpiece work I had hoped but I am going to try to cut myself some slack. Pinwheel, meet that galloping horse. I will share my cautionary tales so we can commiserate about our "bad" days. Mom was having fits with one of her own recently. That might have been part of the reason she called, LOL.
A list mate on the Farmer's Wife Sampler yahoo group suggested scanning the blocks. Until I can figure out where in the house to hang them blocks to take a digital shot that is what I will do. Some of these are my choice of blocks---if so, I will list the name and pattern source. Usually it will be a Brackman assigned number from BlockBase. If they are some that were used in the Laurie Aaron Hinds book, I will indicate the name assigned in the book though the block are in the public domain. We all know that a block has more than one name in a lot of cases. I cannot remember if I am allowed to use the block number or not. BUT all that number is the blocks in alphabetical order till it reached 111. No big deal and I cannot see how that could be copy-righted. Someone will scream at me if I did inadvertently, not see it their way.
LCHJ Block 1---Castle. Pattern source: Quilt Pro Block of the Day for February 22, 2012. I used some of the birthday fabric that I got in Boaz recently for this one.
LCHJ Block 2---Snowball from the book. The fabric strip I used came from my friend and fellow Bama Belle Lois. Some went in the Popsicle Sticks quilt top but this was I set aside for FWIS. It is the perfect shade of blue I had envisioned! Background fabric, coincidentally, reclaimed and re-purposed from some abandoned blocks I recently un-sewed.
LCHJ Block 3---Modified Cherry Basket from Quilt Pro Block of the Day March 26, 2012. Modified because I added the handle to the block. The Riley Blake background, bday fabric. The Basket fabric is leftover from the March Button Up and my friend Sheila.
LCHJ Block 4---K022 Aunt Mary's Favorite. Since I was foundation piecing the center square in a square section I did the side pieces that way as well. The pinks are some of Boaz b'day splurge.
LCHJ Block 5---from the book Wild Rose & Square but I modified it to eliminate some seams. (Print fabrics are Vintage Modern and DJ bday splurge). I talked about a technique for doing the diamonds the other day. Mom reminded me that these were not true diamonds----and she is right. I had called them the wrong thing--they are indeed parellolograms and I knew that when I cut them, LOL with the Marti Michell template conversion charts.
I did so well with one half of the block. SIGH. The squares fit in perfectly and without hassle. The third one gave me a little trouble but I got past it. The 4th one, not so much. 4 tries, two with re-cutting. Finally I got that stinkin's square in there----and then I promptly sliced that square when the ruler slipped in trimming off the little hairs for the picture. I patched it and you can see the seam down there without looking too hard. This may or may not make the cut but I did finish it.
LCHJ Block 6--from the book, Waste Not. The same night I sliced up the one above, I got right back on the horse and stitched this one. I used a Marti Michell trick for cutting it out---it is just half square triangles essentially with another piece angle cut, sewn and flipped. Fabrics from my stash though I did get that white piece at Heart to Heart recently.
LCHJ Block 7---1266b Whirlwind. This is the one that was demoralizing me yesterday. The first one I pieced conventionally and the center looked worse that this one. I took it out--twice--and made it worse. I foundation pieced it and everything looked fine---till I joined it. I think that the Kenmore (nope still not named) may have been balking at the seams as I had it pinned and perfectly in line. Pinwheel, meet Galloping Horse. The print piece is actual vintage fabric. The teal was a bday gift from my friend and fellow Bama Belle Teresa.
LCHJ Block 8---Autumn Tints from the book. I had to prove to myself that I could piece! Even this one would not nest at center but I fixed it. It was not one I had cut out in the last cutting and kitting binge but it may take the place of the one above in with the same fabrics.
LCHJ Block 9---30's style butterfly that I told you about in THIS POST. Well, I did it because I sure needed to not be piecing anymore yesterday. Pretty cute, if I do say so. It will go on a spot lower down the line.
LCHJ Block 10---yeah you have seen it before. So far it is still staying in but down the line. From the book (sort of) Seasons but not really from there---more like credit to Fons and Porter for their mag article on Album Cross, but re-sized from 8 inch block to a 6.
So there you have it for now. No more whining about what didn't go right, at least not for today. I am chosing to focus on what I did get done. That is to say I have 10 blocks completed that I didn't have done a couple weeks ago after months and months of wanting to work on this project.
Today's plan: hand applique the sections of 3418 The Whirling Pinwheel that you saw laid out in THIS POST. Well, make that the straightened out version, LOL. Get that done and it is on to Practical Orchard. Yep, back on that horse.
And sew it goes------thanks for stopping by!
Sep 14, 2012
today's tip
Often you will read pattern directions that say something like "layer the two strips right sides together and cut x many squares something and 7/8. Keeping the two fabrics together, sub-cut into x many half square triangles by cutting on the diagonal line. Do not separate them as they are ready to chain into the machine"
Yes, that is how it is done all right. Of course you could also do cut the strips a tad wider than needed and then use thangles or triangles on a roll and let the paper stabilize it while you sew, especially if you have a lot of them to do for your project but that is not the tip.
That direction might work for half square triangles but I will mess up the placement on quarter square triangles every time if I leave them stacked like this. There are two possible sides to sew on so which one is it?? Okay, I grant you that there are three sides but I DO know not to sew on the longest edge---yet. That is the edge that joins the pieced unit I am going to create to the larger half square triangle. If I sew on the "wrong side" does it change the fabric placement in the block? Probably but maybe not? I don't even want to test that theory and un-sew. I had enough re-do's LAST night, thank you very much.
Do yourself a favor and lay the block out just like the picture in the pattern shows. Look-- and look again-- to see that they are in the "right" spot. Pick one color or the other up in the same sequence, make sure it is the one on the top on all four of them and place a pin on the side you mean to sew You will have to rotate a couple of them in your hand to pin them because this is a pinwheel block and it spins. I'm going to put the teal over the feed sack as it is easier to start sewing from THAT end as I think it will be less chance of chewing the fabric. But I could be wrong about that.
Also do yourself a favor and make yourself a little design board. This is a tip I got from my pal and quilt mentor Joy who had a lot of other good ideas that I follow to this day. It is just a piece of cardboard cut big enough to put in the bottom of a pizza box and covered with some quilt batting. (Actually I have two of them---one with a black felt background but this one was closest.) The batting holds the pieces in place unless a nosy kitty comes along and it is portable. When it is time to play with the blocks you'll probably need the design wall space but for one block, this works fine.
Cheapie vinyl tablecloths that are flannel backed work fine for design walls. You can pin to them if you have to because you are not likely to actually use if for anything else once you get it string covered anyway. Got a tricky placement of a whole quilt or you want your block placement to stay put but no time to sew?? Pin it on, roll it up and put it away till you are ready. The Belles and I did that to a bed sheet at a quilt meeting in someone's home one day as she would not have us standing over her shoulder till the project was done.
I used to clip mine to the shelving unit and then roll it up but now I sew in that space. I have a little design wall space but has other stuff all over it, some things that need to be kept handy making it more like a bulletin board , come to think of it. Since it was the only available wall space in my room, it is not ideal--some areas are hard to get at to pin, even if it were not covered. Oh well! We do what we need to do to make our spaces work for us, right?
And sew it goes----more about this block, pattern etc later. Hope things go better than they did last evening! More on that later too when I post the blocks.
Yes, that is how it is done all right. Of course you could also do cut the strips a tad wider than needed and then use thangles or triangles on a roll and let the paper stabilize it while you sew, especially if you have a lot of them to do for your project but that is not the tip.
That direction might work for half square triangles but I will mess up the placement on quarter square triangles every time if I leave them stacked like this. There are two possible sides to sew on so which one is it?? Okay, I grant you that there are three sides but I DO know not to sew on the longest edge---yet. That is the edge that joins the pieced unit I am going to create to the larger half square triangle. If I sew on the "wrong side" does it change the fabric placement in the block? Probably but maybe not? I don't even want to test that theory and un-sew. I had enough re-do's LAST night, thank you very much.
Do yourself a favor and lay the block out just like the picture in the pattern shows. Look-- and look again-- to see that they are in the "right" spot. Pick one color or the other up in the same sequence, make sure it is the one on the top on all four of them and place a pin on the side you mean to sew You will have to rotate a couple of them in your hand to pin them because this is a pinwheel block and it spins. I'm going to put the teal over the feed sack as it is easier to start sewing from THAT end as I think it will be less chance of chewing the fabric. But I could be wrong about that.
Also do yourself a favor and make yourself a little design board. This is a tip I got from my pal and quilt mentor Joy who had a lot of other good ideas that I follow to this day. It is just a piece of cardboard cut big enough to put in the bottom of a pizza box and covered with some quilt batting. (Actually I have two of them---one with a black felt background but this one was closest.) The batting holds the pieces in place unless a nosy kitty comes along and it is portable. When it is time to play with the blocks you'll probably need the design wall space but for one block, this works fine.
Cheapie vinyl tablecloths that are flannel backed work fine for design walls. You can pin to them if you have to because you are not likely to actually use if for anything else once you get it string covered anyway. Got a tricky placement of a whole quilt or you want your block placement to stay put but no time to sew?? Pin it on, roll it up and put it away till you are ready. The Belles and I did that to a bed sheet at a quilt meeting in someone's home one day as she would not have us standing over her shoulder till the project was done.
I used to clip mine to the shelving unit and then roll it up but now I sew in that space. I have a little design wall space but has other stuff all over it, some things that need to be kept handy making it more like a bulletin board , come to think of it. Since it was the only available wall space in my room, it is not ideal--some areas are hard to get at to pin, even if it were not covered. Oh well! We do what we need to do to make our spaces work for us, right?
And sew it goes----more about this block, pattern etc later. Hope things go better than they did last evening! More on that later too when I post the blocks.
Sep 13, 2012
Of Blocks and Butterflies
I did not get much sewing done yesterday though I certainly was trying to. I am afraid that in cutting out #106 Wild Rose and Square at left that anything I may have ever known about cutting or working with diamonds left the memory banks. In fact, I am STILL not entirely sure where I went wrong. Was the strip supposed to be folded to get the mirror shape for the bottom portion of the block---or not?? I sure had to re-cut it to get them to face the correct direction. The red piece twice!!
It has literally been years since I even attempted to sew diamonds. I have a Lemoyne Star cut out but it uses a Bethany Reynolds idea for piecing it and adds more half square triangles than you need. See? I chickened out that time too! BUT it is on my quilting bucket list. I think the badge is still on my sidebar to verify it.
I cut this out at least 10 days ago. I probably groaned when I saw the diamonds but decided to pull on my "big girl panties" and try it. Okay, it is y-seams and I needed some review. To be fair, the block in the book was drawn with unnecessary extra sewing lines, I, me personally, am the one that drew it up so it was diamonds. NOT the author of The Farmer's Wife Sampler Quilt. Can't blame her. I gave myself this challenge. Marti Michell's templates helped a bit till I apparently did not read correctly. Also some how I cut those half square triangles the wrong size too. BUT that might work to my advantage to sew them on and then trim the section down.
Back to the y seam thing. I remembered that you " sew to the quarter inch spot, tack, take it out of the machine and sew the other side till you reach the quarter inch spot". I think that is the process, right?? Off I went to you-tube though I could have gone to my Fons and Porter "go-to, quilt bible" Quilters Complete Guide too. I am glad I didn't in the end as it turns out Kaye Wood has a Q-Typ on the subject.
It has literally been years since I even attempted to sew diamonds. I have a Lemoyne Star cut out but it uses a Bethany Reynolds idea for piecing it and adds more half square triangles than you need. See? I chickened out that time too! BUT it is on my quilting bucket list. I think the badge is still on my sidebar to verify it.
I cut this out at least 10 days ago. I probably groaned when I saw the diamonds but decided to pull on my "big girl panties" and try it. Okay, it is y-seams and I needed some review. To be fair, the block in the book was drawn with unnecessary extra sewing lines, I, me personally, am the one that drew it up so it was diamonds. NOT the author of The Farmer's Wife Sampler Quilt. Can't blame her. I gave myself this challenge. Marti Michell's templates helped a bit till I apparently did not read correctly. Also some how I cut those half square triangles the wrong size too. BUT that might work to my advantage to sew them on and then trim the section down.
Back to the y seam thing. I remembered that you " sew to the quarter inch spot, tack, take it out of the machine and sew the other side till you reach the quarter inch spot". I think that is the process, right?? Off I went to you-tube though I could have gone to my Fons and Porter "go-to, quilt bible" Quilters Complete Guide too. I am glad I didn't in the end as it turns out Kaye Wood has a Q-Typ on the subject.
And this puppy works! Although I was sewing itty bitty squares and she was using huge diamonds, this tip works. I found that using a stiletto helped pivot that small square underneath to line it up with the diamond on top. Try it out and see what you think! Or did everyone but me know about this? THX. Kaye for the help you gave me yesterday even if you didn't even know it.
I'll finish up the block in a bit and move on to another. It is still a tad bigger than it should be so hopefully I can fudge it in----it goes on the left side of the quilt anyway and off the bed. I'll have to see what other learning opportunity I will have today. The little cherry basket handle on Tuesday was a reminder about basting and/or appliqueing down the inside curve first and the outside last. Skills you do not do often led to questioning and double checking. No one likes doing re-work.
_____________________
_____________________
Okay, that leads to butterflies. I was thinking the other day that I need to have a butterfly or maybe even two on my sampler quilt. What clinched that notion was seeing my blogging buddy Kitty's version in a recent post . Read the post, of course, as she is doing something really fun with some scraps that will go in a wonderful heart quilt at some point. About 5 pictures down she has some butterflies that she did way back in 79. In an email back and forth initiated by a comment I left her, she told me her version was from Feb 78 Quilt World. I was not asking for the pattern--just admiring her choice. Too cute!
I have a collection of butterfly blocks and will do a sampler at some point. EQ has a bunch of them too. BUT the one on the right (or in the vicinity, LOL) is the first one my mind went to. I had this shape sketched off on a cardboard template and it used to be on my bulletin board for years. Classic 30's style butterfly with black embroidery on the top of it. Once I found the one online just like it, I ditched the cardboard. You can get the image at http://www.jeanneraecrafts.com/butterfly.htm for a 9 inch butterfly to apply to a 10 inch base. (That link is in case you cannot read my handwriting which after years in nursing admittedly is not always easy to read. ). However, I wanted more like a 5 inch one to go on a 6 inch finished base. Easy, peasy process. Download the image, open it up in Irfanview (freeware/shareware image software I have used for years and years). Click print and then tell it what size you want. I tried 4 inch first and it was way too small. 5 was perfect when I laid it on my square ruler to be sure it would work for an on-point setting.
Then there are the pieced butterflies. I've got quite a few patterns for that too. Marsha McCloskey's butterfly from Quilts for Katie Rose is a good one too. AZ Patch has a couple of fun ones---August 2011 BOM and May 2001 is a bit more stylized. Oh, there are some really cool BOM blocks on AZ patch that I had forgotten about. Printing and bookmarking about to ensue! There are other butterflies that I have clipped from quilt mags. Or the one Cher used from the now gone Quilter's Online Resource pages is good too. No lack of choices, in other words.
I don't know if this pattern is still available from Lazy Girl Designs or not as I could not find it on search. Currently, there is an abandoned block of a butterfly and a Bed of Roses block hanging off my shelving unit. Marilyn gave me them for a pastel-y donation quilt with leftovers that I have in mind. I have made this quilt before though. I've got the ruler so I can make more. It does make a cute, cute girlie quilt in pastels or brights making for a fun block that finishes 8 inches in the existing patterns.
Looking at this sharp angle may have just triggered another application for my needs---that Criss Cross fun and done has about a 120 angle template that you start the block off with . Maybe, just maybe this will help. I'll check in a few minutes.
And sew it goes----my mind is always flitting around around just a butterfly. Never know what tangent I will find to explore on any given day, do you? Spreading joy and quilting knowledge, (mine or someone else's, LOL) like raindrops---that's me. Just kidding. Let's just say, I know what books to pull and how to search online but I have also learned a few quilty things in the last 24-25 years.
Have a great day and thanks for stopping by!
I don't know if this pattern is still available from Lazy Girl Designs or not as I could not find it on search. Currently, there is an abandoned block of a butterfly and a Bed of Roses block hanging off my shelving unit. Marilyn gave me them for a pastel-y donation quilt with leftovers that I have in mind. I have made this quilt before though. I've got the ruler so I can make more. It does make a cute, cute girlie quilt in pastels or brights making for a fun block that finishes 8 inches in the existing patterns.
One I had actually made was one Mom had kitted up. I know she has done several over the years in the 700 she has made and donated. BUT my mom is one smart cookie! She figured out a way to NOT have to applique the butterfly bodies down later. If you piece the body portions as the pattern calls for and then trim a bit of that away on both sides, then you can strip piece contrasting butterfly body sections in if you want them all the same color, like black and your back ground fabric remains consistent. Otherwise, there would be measurements to cut the body sections. This is a variation, I found, that makes life a whole lot easier and adds more interest to the block. Embroider the antennae or use a pigma pen. As I said the Lazy Angle ruler helps with piecing the angled bits. I've drawn in EQ so I can make it be any old size I want and the ruler goes from 1 1/2 to 6 1/2 as well.
Looking at this sharp angle may have just triggered another application for my needs---that Criss Cross fun and done has about a 120 angle template that you start the block off with . Maybe, just maybe this will help. I'll check in a few minutes.
And sew it goes----my mind is always flitting around around just a butterfly. Never know what tangent I will find to explore on any given day, do you? Spreading joy and quilting knowledge, (mine or someone else's, LOL) like raindrops---that's me. Just kidding. Let's just say, I know what books to pull and how to search online but I have also learned a few quilty things in the last 24-25 years.
Have a great day and thanks for stopping by!
Subscribe to:
Posts (Atom)
.jpg)
.jpg)
.jpg)


.jpg)