Same block in the end, but another designer calls it “Puzzle Box”. She has you cut up a boat load of rectangles. Now, that would be good for the scrappy quilters amongst us. Christa offers her pattern for free if you sign up for her Friendly Threads newsletter. I have a copy of it too. Her link is http://christaquilts.com/tutorials/ .
One morning it hit me how you could make these blocks using charm squares. Who hasn’t picked some of those up at a quilt shop or Missouri Star at a good price with no particular plan in mind? I sat down and whipped up a couple using my alternate technique. I am calling my version “Charming Boxes”. Here is my recently completed top.

If you are using commercially prepared charm packs, you will need two packs of the focus prints and two of background. If you want to combine fabrics from all the same product line, buy 4 alike. The blocks will finish at 8 inches. With a standard 42 charms per pack, you will get 42 blocks. Set 5 x 8, the quilt will finish at 40 x 64 without borders. 6 x 7 would be 48 x 56 without borders.
Ready to get started?
Step 1
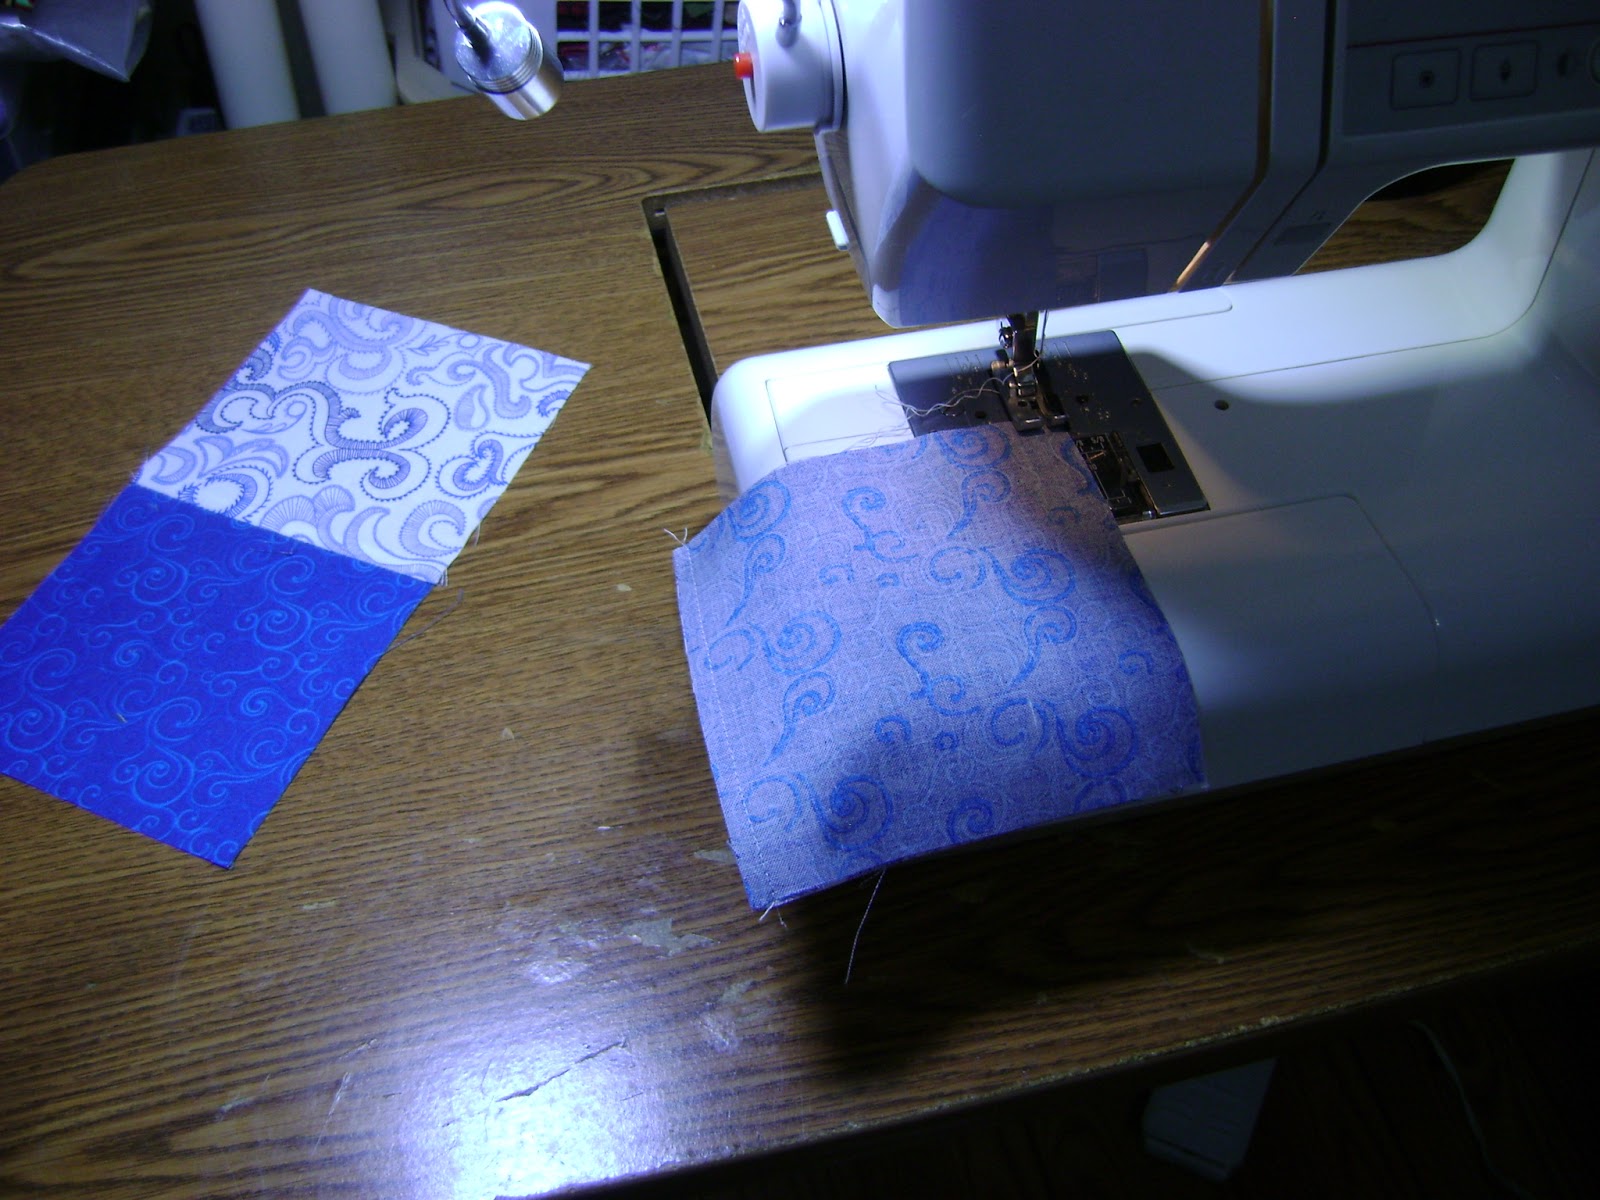
For one block, take two matching pairs of background color and two matching pairs contrasting color, medium or dark. Like you were making a giant 4 patch. Place right sides together.
On one pair, sew on just one side and press the seam to the darker of the two colors.
On the other pair, sew your quarter inch seam on BOTH sides of the paired squares. I don’t know how well the light thread shows up in the picture but I think you get the idea.
Step 2
This is actually the first step for making 4 patches if you refer to the Moda pdf file on their blog for “What Can I Do with a 5 inch Charm Square?” http://blog.modafabrics.com/funfree/sewing-tips/ click on the image to open the file.

You end up with two sections for the middle of the block section of the block. Sew them together using a dark light dark light sequence.
NOTE: if you are using a directional print, you will have to re-sew the 2nd pair if you don’t want it upside down. You have to rotate the piece 180 degrees to get the right sequence. On my top using Beach House fabric, I found I had fish floating belly up and realized what was happening after I had to re-sew a few blocks!
Once sewn, trim the section down to 4 1/2 inches. It should measure 8 1/2 inches in length or close to it. Three seams can make for some variance but it will still work. If the outer light strip is a little wonky it can be “fudged in”
Once sewn, trim the section down to 4 1/2 inches. It should measure 8 1/2 inches in length or close to it. Three seams can make for some variance but it will still work. If the outer light strip is a little wonky it can be “fudged in”

NOTE: You could eliminate this step if you like. The block would not be square when finished but it does not really matter if it is a half inch longer as you do not rotate the blocks horizontally. As a rule, the blocks are arranged alternating dark row, light row, dark row, etc. though Christa shows a variation on her free pattern you may enjoy. If the outer light strip is a little wonky it can be “fudged in”
Step 3
Now take the other single
seamed piece from step 1. Cut it at the 2 1/2 inch mark on your ruler again though this time in a HORIZONTAL cut. This will form the top and bottom
sections for your block.

Step 4
Sew the sections from
Step 3 to the top and bottom creating a light side and dark side of the block.

Step 5
Trim down the block. I advise reversing the block from this
picture and line up the dark half of the block on the mat to the left. That dark edge is straight where the light
side may be a tad wonky with 3 seams that could be a hair off. On the light side cut it 8.5 inches or
whatever your blocks consistently measure.
Any variation on the center of the block can be compensated for if you
know the top and bottom sections are cut consistently to size.

Yes, there is a small amount of fabric wastage but it is minimal. I found a real time savings with this version as it takes less than 5 minutes to make a block if you finger press and don’t over-pin! There you have it---another way to make a block that appears the same but with charm packs.
For the quilt top:
Assemble the quilt in rows with blocks on dark side on the left (for however many blocks you wish to make) alternating with rows with the light side on the left side. See the picture on page 1 for a layout example or better yet, Google "Split Decision quilt" and click on images for all kinds of color inspirations! Lovely done in batiks or even limited color palettes such as black and white/neutrals are quite striking.
At this point I do not know how to add a printer friendly version to the blog but I DO have a pdf, doc or docx version written up. Should you want a copy of it, let me know in comments making sure I have your email (some of y'all are no reply bloggers!) and which version you prefer.
This is great :) I do have the pattern using the jelly roll but I have so many charm packs this would be great for them. I would love a pdf copy. Thank you so much. jaaverill@aol.com
ReplyDeleteThank you for the tutorial! It looks like a fun and easy quilt block. I always have charm packs that I've acquired, and I'm never quite sure what to make with them. :-)
ReplyDeleteThanks again!
You are most welcome, Lucy M. I hope you'll give it a try with your charm pack collection. Seriously, easy and quick too when you need a donation quilt, baby quilt, whatever!
ReplyDeleteGREAT tutorial, Linda! Reading through your instructions, I had one of those "light bulb" moments and thought - "Now why didn't I think of that?" - ;))
ReplyDeletewow look at you designing quilt patterns and posting tutorials! awesome job, thanks for the lesson :) and still love the quilt, I never would have thought to use white or even a solid with this pattern, but I don't have much imagination, just do what the instructions say most times. Have a great day!
ReplyDeletethanks for the tutorial! testing to see if this comment is still a no-reply blogger... testing...
ReplyDeleteAhhh! Sew simple! And a recent tutorial, one that I missed. In my defense, I was preparing for cross country travel at that time and not on the Internet! I'm definitely bookmarking this page for future consideration! Thanks! XO
ReplyDelete