I got up this morning thinking that I would clean my bathroom since I had spent part of my Tuesday dusting, straightening, vacuuming my bedroom and sewing room. Yeah, right! That notion lasted till about 9 or 10 a.m. I like things to BE clean but I do not LIVE to clean. Know what I mean?
I found a ziploc bag on my sewing room pegboard yesterday afternoon with the kitted up grocery bag holder from the sew-in. Shelia had walked Aline and I through the process at the sew-in and had all the materials ready for us but I didn't take any notes. See, no paper in front of me! How did I expect to remember especially when I had other creative things on my mind?
I DID find THIS TUTORIALon
a site called Make It and Love it. I don't think the tute used batting
but Shelia had some packed in there. I spray basted the fleece to the
backing and we were to do a sew and flip method. Then I was lost.
I could not remember what Shelia had said to do about a casing for the elastic so I kind of, sort of followed the tutorial---maybe. I stitched it down like you would mock piping sewing the cut strip with right sides together and a 1/4 inch seam, single thickness though so not quite like binding. I folded the fabric up to the edge of the quilted piece and then using another tip Shelia gave us, folded it up to the sewing line and dabbed a bit of fabric glue on the edge to hold it for machine stitching. It looked perfect front and back. Then I did the "elastic on a safety pin to push through the channel thing" with a hemostat clamped on the other end to keep it from slipping inside.
I used about 6 1/2 inches of 1/4 inch elastic in the bottom end to keep the bags in the bag and about 11 inches in the top for loading purposes. I have to say that my Brother really bulks about sewing through about 4 layers but I got the job done and the strips all line up fairly well. Shelia did the recycle labels on her new embroidery machine but didn't quite get them centered. I was too quick to get it machine appliqued down, like before I figured out which way the strips were supposed to go.
Lastly we made a quick run to the big box store for some black grosgrain ribbon that I wanted for the hanging loop. I didn't do handles as one, I should have stitched that into the casing first and two, I did not want to try to stitch through that bulky seam again. I put the loop in the back near the center.
Yeah, I know we should use cloth bags and I do when I remember to haul them in the store but we also need the plastic ones for cat box clean out, wet kitchen garbage, liners for the bathroom wastebaskets etc.
So here it is stuffed to the gills and hanging in its new home in the laundry room. The old wastebasket we used to use will be used for recycling the pop cans and plastics.
We have had some rounds of thunderstorms today plus I was getting super aggravated with the computer today freezing up and updating software. I signed off for several hours and finished reading a library book I had started last night.
Maybe tomorrow I will feel more compelled to clean up the bathroom? I'll find something else to capture my attention--probably my version of the Tammy bag. It will be a new experience for me working with that purse clasp thing. Wish me luck, LOL.
I may have flunked Kanzashi Flower Making 101 as there looks like I have too much thread and maybe did not follow the instructions quite to the letter?
It is not the Bitty Bits and Piecestutorial fault, I do not believe but I just don't know how tightly you are supposed to string the petals together. My friend and fellow Bama Belle Bev might be able to straighten me out at our next meeting as she has been making these with the Clover doo dads. I know you need a long sturdy thread.
I was using 7-cut 3 inch squares for this version and also cut out 8-2 inch round circles of the reverse coloring to try one from a tutorial found on Fabric Flowers. It gives a little different look for varying squares and rounds. Really I am just goofing around but may put one of these on an existing purse for the upcoming flower blog hop.
EDITED: From the Fabric Flowers site I found a couple other tutorials for the flowers. The one by rodneybones on instructables for kanzashi simplified hair clips looks good. And after folding itty bitty cones from those 2 inch round circles this Anna's Flowers tutorial from Sew Ritzy Titzy looks even better. She uses a larger cut circle then sub-cuts into half circles and then works the magic plus some of the work is done on the machine!! Pinning, bookmarking and converting to pdf on my end!
Though I cannot show you my wall hanging till the 31st, it is finished, much to my relief, with about 10 days to spare. I took the last stitches in the binding and buttons yesterday afternoon. Woohoo! It is currently hanging in the place of honor above my bed.
Though the sun was not really cooperating, I tried to get some outside shots of it on the neighbors fencing again. That worked out quite well last time with a decent picture or two. I've got a couple that should work. Glynda said to move the flower pots around if I wanted but dead head the petunia so I didn't get some dead blooms in the shot. LOL Actually I knew she would be in the shop on Monday's and I needed to verify my next hair appointment too.
Then it was off on the grocery run and lunch. Chatting with my pal Norma as she is off work today, this being Victoria Day in Canada. Meanwhile I debate about what I might sew next----work on the May and/or June rows for guild to get caught up OR start on my Tammy bag for the mid June hop? Just to get the decks cleared a bit I am thinking Tammy Bag. Not sure what I am talking about? See Sew We Quilt THIS POST
~~~~~~~~~~~~~~~
Speaking of blog hops, I am happy to announce that I won a couple of giveaways in the bird hop! First I heard from Jan in GA who posts onSew and Sow Farm. I had won the Crazy Daisy charm pack from Benartex that she and her wild chicken Daisy picked out. Rather than spreading them all out and getting a shot where you can't see them anyway, try THIS LINK if you are not familiar with the line. Fun fabrics! I am debating whether they would work in my Farmer's Wife Inspired Sampler OR just combine them with existing stash for possibly a various sized circle quilt.
Then today I got an email from Fiona of Celtic Thistle Stitches informing me that I would be receiving some patterns from Helen at Bustle and Sew. I'll quote Fiona's blog notation here. . Since she is in Ireland arranging with Helen for pdf files to be sent was a wonderful idea! No one is out the mailing costs.
Fiona had made her rendition of the Birds on the Wire and the Seagull Cushion for her blog entries.
THX again to both generous ladies! I surely appreciate it and am surprised my name got pulled from all those entries!
Well, looks like it is almost time to go scare up something for us for supper. We will be doing a bit of cleaning out the freezer again but I never mind that, it keeps the grocery costs down when I can re-purpose the meal. DJ was just happy to see the rest of the Blonde Sheet Cake come out of hiding, LOL---Mr. Sweet Tooth. He also paid me a rather backhanded compliment saying "you used to do a passable job but now you are a GOOD cook" He was saying that he had never been interested in cooking and I said that was not a good thing as what do you do when your wife is not available---eat out or open a can of soup, either way it is either pricy in the long run or not good for you. He then went on to say that he bet I was a better cook than my mom. Who knows? Modified diet for medical reasons, could be. Maybe because I can make a variety of different ethnic foods and do often? Growing up it was 8 mouths to feed and stretching the food budget with basic home cooking, what I learned to cook. I am a champion potato peeler as that was my job to help out. Oh I can hear the phone ringing now, LOL. Love you, Mom and Dad. I do NOT know how you two managed it.
This particular rain system started up about 8 last night or so, I think. Wave after wave has come through and the weather alert radio went off at around 3 and 5 a.m. warning of flash floods. I believe it!
We live on a hill that was cut away with our lane being the old road and the new below about 6-10 feet down. Ignore that crappy view of the neighbors back yard (SIGH) and maybe you will see the water standing in the yard and also rolling down that slight incline.
It always puddles at our driveway entrance for some reason while rolling down that slight incline. I don't know that I can capture it but it is pouring----again!
When we got up at 0730 there was 4 inches in our gauge. Another half inch has fallen since then and it is still coming down. I asked DJ if this is the most we have ever had, because I sure didn't remember quite that much.
He thought we had had 4.5 before but would have to check the notes in his little pocket calendars. The gauge only goes to 5 inches. Enough already! DJ said there are rain chances tomorrow as well. I just hope that this has improved the drought status down in the lower counties. The farmers said they needed a dry spell up here to plant. I have a feeling no one is going to be happy at this point.
I had planned on quilting today but there are occasional thunder bumpers. We'll see. I did start a bit last night but am not fond of the way this machine (my Brother) is quilting and will swap out for my trusty friend (the Viking) to continue. I was not feeling "as one" with the machine, at all and I don't want any mess ups.
And sew it goes----till it doesn't, LOL. I may be doing some redwork or knitting today instead.
Okay, I have a few minutes to chat about quilt meetings. My
appliqued wall hanging top is completed and I will be pinning it as soon
as I track down some batting that is suitable for both machine and hand
quilting. More on that later.
This past Saturday was Girlfriend Friend Day AKA Friendship Quilter's guild meeting day. Jane drove and Aline, Terri and I were along for the ride. Just a good time for chatting and catching up with each other on the way over. Since I had not shared any of the items I had prepared for all the blog hops I had participated in, I drug them along with me for show and tell.
How I wish we could spend a bit more time on show and tell as it is my favorite part next to the programs. Technically, this is done BEFORE the business meeting but it just feels like we rush through the part. Ithink that is a shame, really, as this is one of the few times where you can talk about your project and get chance in the spotlight. As guild secretary, I keep track of what is made, by whom and give it a name if someone hasn't when they talk about it to preserve guild history and then send a copy to the historian so she can use it for labeling the photos online. I get so caught up with the note taking that I do not get to enjoy the piece near as much. I do like that we have some great display areas now since we have our own quilt racks now. The girls put them up before the meeting and take them down right after, got a system for doing this.
Shelia did the program/demo on how to make a houndstooth block. You have to know that houndstooth is big down here as Paul "Bear" Bryant, former Alabama football coach 1958-1982, always wore his trademark houndstooth hat. She accomplished her blocks by using a tube technique. ( I'll link to something I found that is similar in a second. ) Using this idea she came up with a diagonally pieced block like this
and then alternated with a plain block in between. You had to watch how you turned the block as well as be mindful that the cutting method left you with a bias edge. You laid what is normally two strip sets to make 4 patches atop each other but you sewed again on both of the outer edges. If you are like me that made zero sense and you need pictures!! Knowing how I told you this was constructed can you pick out the pieced sections versus the white and black solid pieces?? Pretty slick, huh? You can see the pattern more easily if you step back a ways from it---or at least, I think so! (Borrowing a picture from the historian here)
Okay, I did find a couple of videos on you tube---not for this block necessarily but to use the tube technique. This is from Missouri Quilt Company for a quilt they called "Summer Winds" that used jelly roll strips. The other from the same site Tube Tutorial resulted in a spool block by using a plain fabric for half of tube and two strips.
So anyway, Shelia said that the big box store had their black and white fabrics marked down and Terri was in need for this for a family quilt project. We stopped for a quick bite and then on to the store before heading home.
Then Tuesday rolled around and it was time for Bama Belles to meet. Three of the gals (Donna, Valera and Bridget) had their machines set up to sew while I was using a slot in the strip plug to work on my applique project. No pinning even though Lois did have a top but no helpers with the desire to drag that heavy table out and do the job. She is recuperating from a recent procedure and could not help. (We'll do it at the next one, I promise). Beverly had some hand work going while Lois looked at some of the material we have on the library cart while she is out of "active duty", LOL. Marilyn and Jane were working on the quilts for Mexico project---Jane pressing and Marilyn cutting out some squares. Janet was trying to get a backing together for a project she was taking to the long arm but had mis-cut at home. She asked me to give her some advise and it helped to be able to spread this out on a couple of tables. About half the group took off for Olive Garden for lunch but I opted out because I had some of that cuisine in my menu plan at home. Next thing I knew it was 2 p.m. and I grabbed something on the way home.
A little hint of the flower hop applique project. I got the remainder of the borders on it yesterday. I had shared a preview of what I am making with my blogging friend at A Left Handed Quilter last week before it had the borders on it. I shared what the pattern jacket should look like as well-----I think. Anyway I had said that I was not crazy about piecing narrow borders like this. Normally I would just put a folded flap of color there and this time with the borders being so narrow I was going to have to suck it up and stitch it in and was NOT looking forward to it.
LHQ had a suggestion though. She had made the Harmonic Convergence quilt from Ricky Tims which has a narrow border but you flipped the thing over and lined the left edge of the presser foot against the previous seam line as a guide and then set the seam allowance accordingly trying to maintain and equal distance. Try it and see, she said. UHHHH visual learner here. I went googling, looking for a video or clarification anyway.
I found THIS when I searched for narrow borders----from Ricky's book which I no longer own. I didn't finish my version of his quilt (yet!) but figured I no longer needed it when all I have to do is borders and sold it on amazon. I also found something on quilting boards that had good step by step graphics for this very thing. TRY THIS and scroll down to the #6 post. The writer going by the screen name of "ghostrider" attributes this to Joen Wolfrom.
I DID try this last night and it worked, wonderfully. The green strip finishes at a hair below a half inch and looks very even all around. I DID have to square up the last border a hair afterwards. I think they even said that your "goal is perfect seam to seam distance, not a perfect seam allowance" on the right handed side.
Also one other thing from this morning---those microwave fabric bowls were something a few of the gals were making at sew-in earlier in the month. Erika was using a pattern she had gotten from Quilters Cottage in Garden City, SC which they called a "soup bowl koozie." Possibly from a shop hop or something as I do not see a free pattern tab on their website. Someone in a facebook group I belong to asked about them this morning. Others suggested another site for a pattern for sale. Once again, google and quilting board to the rescue. Good tutorial there and apparently these have been around for several years if you see the date this was posted. TRY THIS. (Image borrowed from the guild sew-in pics.) Also by varying the size of the cut squares she suggests that these could accommodate round casserole dishes and larger bowls With holiday gift giving coming up it might be something you will want to try for that???
That's all for now-----still not dressed and I had hoped to run a quick errand before lunch. At this late stage of the game it might not happen, LOL.
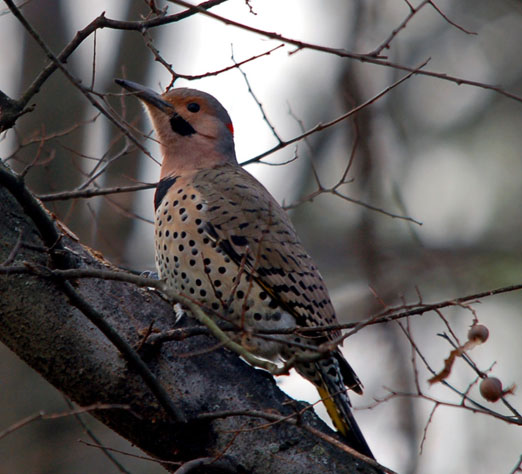
The Alabama state bird---Yellow Hammer or Northern Flicker
(Image found at Locust Fork dot net)
My quilt group met yesterday and I'll report on that tomorrow especially since I didn't mention anything about the recent quilt guild meeting either. I am busily trying to hand applique at this point and my fingers need to keep busy anywhere but on the keyboard keys at this point -- this needs to be done in two weeks for the next hop. No, I didn't absolutely have to do it this way but the machine I like for machine button hole applique probably needs to go in for servicing. While I am making good progress, I am not "there" yet.
Meanwhile, today is the last day for the "It's For the Birds" Blog Hop. I hope you have been as entertained by the participants as I have been. Rumor has it there is a hop called "pecking order" coming up later in the fall so I guess all of us who were featured this round may get a chance to do that alternate idea or two we had considered.
How about you? Ready for more bird themed eye candy? Get caught up looking over the weekend? Hop on over and see what's going on at these websites (while I work on my appliqued piece for the next one)

.JPG) I could not remember what Shelia had said to do about a casing for the elastic so I kind of, sort of followed the tutorial---maybe. I stitched it down like you would mock piping sewing the cut strip with right sides together and a 1/4 inch seam, single thickness though so not quite like binding. I folded the fabric up to the edge of the quilted piece and then using another tip Shelia gave us, folded it up to the sewing line and dabbed a bit of fabric glue on the edge to hold it for machine stitching. It looked perfect front and back. Then I did the "elastic on a safety pin to push through the channel thing" with a hemostat clamped on the other end to keep it from slipping inside.
I could not remember what Shelia had said to do about a casing for the elastic so I kind of, sort of followed the tutorial---maybe. I stitched it down like you would mock piping sewing the cut strip with right sides together and a 1/4 inch seam, single thickness though so not quite like binding. I folded the fabric up to the edge of the quilted piece and then using another tip Shelia gave us, folded it up to the sewing line and dabbed a bit of fabric glue on the edge to hold it for machine stitching. It looked perfect front and back. Then I did the "elastic on a safety pin to push through the channel thing" with a hemostat clamped on the other end to keep it from slipping inside..JPG)

.JPG)


.JPG)