It's Talladega race weekend and Oxford will be jumping because of the influx of people to the area but here is my little corner of the world my only concern is that my husband have a "happy day" as he passes a milestone birthday. We still have storm door work ahead of us as we basically only got as far as figuring out how the hinged section went on the door itself when it was time to quit. (talk about the blind leading the blind there!)
He has informed me that he wants to eat somewhere near the mall area (about 12 miles south of us) and we will walk around Oxford Lake rather than our section of Chief Ladiga Trail or around the adjacent town park. Meanwhile, I am still in my pj's, thinking about hopping in the shower and doing some of this applique.

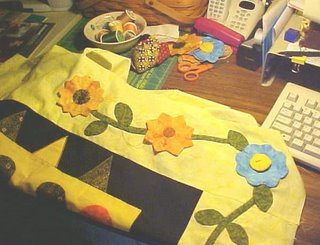
Here is the view from my desk this morning. I've got the two sections of stems stitched down and this section of the applique at least basted in place. Hanne showed us her small sunflowers in her post Sunflowers galore and gave me some advice on a cutting method that expedited sewing these little jems. I scaled down an EQ pattern so the motifs would finish about 3- 3 1/2 inches. I knew that the templates needed to be turned into small tumblers in order to make them pointy from making a regular sized Dresden plate like Evelyn AKA Starfishy. I don't know how well the picture will show up I have both 8 pointed and 12 pointed sunflowers here. There is method to my madness, of course--the edges are already turned on them and no needle turning. The blue one and the beehives you don't see in this picture are freezer paper version.
I think it would be far, far easier to applique in block form than a wide border like this. I keep catching the fabric beneath in the stitches and of course, don't see it till I've done a few inches more work. The fabric keeps fraying away in the outside edge of the border too making me think I should have basted down the edge, zigzagged it or ran it through the serger or something ---like you would do with a cross stitched piece.
I was referring to Rodale's "Sensational Sets and Borders" for something else and found out that I could have (should have ?) NOT sewn the borders on first. I was supposed to start the applique, leave the ends loose and then joined them up or left them loose and then appliqued the corner flower on over it. Then join the almost finished pieces to the quilt. Too danged late to discover that when the stems were halfway stitched on, LOL. How would you more experienced folks do this?? ACK, Jeanne is one of them and she is on her way to Vegas.
The other thing I also discovered after trying it "wrong" the first way was I should sew the flower down first and THEN the center. Here I was happily buttonholing around the sunflower center and even stuffed it slightly and the flower is pulling up like a coolie hat, LOL.
I will get through this--I better as the deadline is only a week away now. Y'all may find me in a corner curled up in fetal position sobbing uncontrollably but I WILL get done or learn to enjoy the process a little more as I go along.
Forest Jane, it is the inside curve first stitched down first--that gives the longer outside edge more room to stretch.
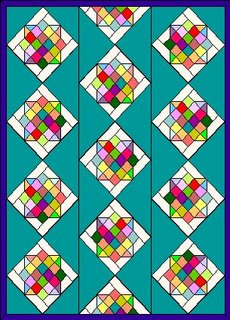
Evelyn if you are reading this--what I was looking up in that book was how to do that zig zag set you were using for your blue blocks. I keep tilting my head trying to figure out how in the world you cut strips sewed around them. An email from my mom said that she had used half square triangles to accomplish that on one of her quilts. The book said it was quarter square triangles in a strippie set. Armed with that, I drew up the "Whatever" blocks in that set though I like Forest Jane's sashed and cornerstoned version as well. I think it looked good in a half step drop as well so we will see what I finally decide when I get around to sewing the top together.

I'll post something in response to Vicky's post about how I got started quilting soon but I need to look for a couple of pictures that should go with it. I should be looking at the needle in my hand rather than needle in a haystack looking for the pics right now. Or stop being a blabberfingers and end this post, LOL.
Linda, the border is looking great. I love the idea of the sunflowers. I'm sure the owner of this round robin will be very happy with your contribution. As far as applique borders - yes, it's much easier to stitch them before they are sewn on. You do it just as you said - leave the ends loose to applique down after the borders are stitched on. The catch is that you have to make the borders a little longer than normal because applique sometimes draws up the fabric a bit and shortens it. The trick is to leave the right amount loose so you can cut the border to the exact length after most of the applique is done and still have the corner turn correctly.
ReplyDeleteIt's amazing how much we learn by doing, isn't it!
A very happy birthday to you husband - you don't say what "milestone" it is. I hope you both have a great day.
For a zigzag setting I use quarter square triangles so the outside edge will be on the straight of grain. If you use half square triangles it will be on the bias, and will have a tendency to stretch. Just a hint from someone who has learned the hard way. :-)
The quilt sketch looks great - I definitely love this setting!
Hi Linda... the applique looks great! I also applique the borders before I sew them on and if the vine is to wrap around the corner I just leave it loose and finished that bit at the very end. I also cut my broder about an inch or more wider and longer than the finished size so that I can trim them and then the edges are all clean and stable when I sew. I use clear vinyl to make an overlay and draw my pattern on there so that I know exactly where to place all the applique pieces. I use a dark permanent marker to mark a small tick at the true length so I know where the edges are.
ReplyDeleteI usually sew my flower centers onto the flowers first OFF the border. I will usually either remove some of the backing behind them or most of the dresdens have no center so it reduces the bulk. Then I sew the flower to the border as one unit.
Is today (friday) your hubby's birthday? SO is my husbands! That makes 3 people today with birthdays I have come across.
Oh, one more thing. Thanks for the help with the sidebar stuff. I figured it all out myself with your great instructions and I was so proud. Can't wait to cross off something! Thanks again!
Happy birthday to your Dear Husband. I hope you have a wonderful celebration.
ReplyDeleteThe flowers are so cheerful. :)
Darilyn
Happy Birthday to your husband, and, the applique looks great!
ReplyDeleteApplique is looking great, and as a person who doesn't, I have no comment about the process..*G* See how smart I am???
ReplyDeleteHappy Birthday to the DH, and a happy weekend to you...*VBS*
Happy Birthday to your dh Linda! I hope you had fun! The applique looks great!
ReplyDeleteHugs
Laurie
looking great my friend! we are both struggling along with this applique stuff...lucky me to have only two blocks!
ReplyDeleteI love the setting that you did for that block - it is great! Your applique project looks good.
ReplyDeleteLove all the different flowers your doing with that applique. I didn't know it was easier to do the circles last - so thanks for the tip!
ReplyDeleteLove your zig zag drafting. I posted some photos over on my blog about how I did mine - I cut those setting triangles 2X across the diagonal to avoid the bias thing.
Happy B-day to DH!
Cheers!
Evelyn